Outdoor living is a big part of the Australian lifestyle. Whether it’s Sunday barbies, wood fired pizzas with friends or just a quiet night with the family, many homeowners are extending their living spaces outdoors. One of the most popular additions is an outdoor kitchen – and when built under a pergola, it’s the perfect combination of function and style.
Designing an outdoor kitchen is more than just slapping a barbecue on the back deck. It’s about creating a comfortable, practical and weather ready space that suits your cooking habits and lifestyle. Below we’ll dive into how to design the perfect outdoor kitchen under a pergola, with an Australian focus and practical considerations like plumbing, ventilation and weather resistance.
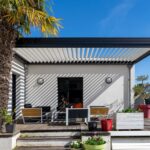
Why Build an Outdoor Kitchen Under a Pergola?
Pergolas are versatile structures that provide shade, definition and intimacy to outdoor areas. By putting your kitchen under one you get:
- Protection from the elements – A pergola shields your appliances and work surfaces from harsh sun, light rain and falling debris.
- Comfort – You and your guests won’t be roasting in the sun while preparing meals.
- Design cohesion – A pergola frames your outdoor kitchen, making it look like an intentional extension of your home rather than an afterthought.
- Flexibility – Modern pergolas can be fitted with retractable louvres, blinds or screens to suit the season.
For many Australian homeowners the pergola is the perfect middle ground between being fully outdoors and having a sheltered alfresco dining space.
Step 1: Plan Your Layout
Before you buy appliances or furniture, think about how you want to use the space. Just like an indoor kitchen your outdoor kitchen should follow a functional flow.
A useful principle is the work triangle, which ensures your cooking, preparation and cleaning areas are positioned efficiently. For example:
- Cooking zone – Barbecue, smoker, pizza oven or even a gas cooktop.
- Prep zone – Benchtop space, chopping area and possibly storage.
- Cleaning zone – Sink with hot and cold water and a bin nearby.
When planning the layout under a pergola also allow enough clearance between appliances and posts to avoid crowding.
Step 2: Choose the Right Appliances
The appliances you choose will define how versatile your outdoor kitchen will be. In Australia the barbecue is king but many homeowners are expanding their setups. Some popular inclusions are:
- Gas or electric barbecues – Built-in models look seamless and can be plumbed directly to natural gas for convenience.
- Pizza ovens – Great for entertaining and a feature piece under the pergola.
- Outdoor fridges – Keeps drinks and ingredients handy without repeated trips indoors.
- Sinks – Installing a sink requires plumbing but makes food prep and cleanup much easier.
It’s worth investing in appliances designed for outdoor use, they’ll stand up better to humidity, rain and fluctuating temperatures.
Step 3: Plumbing and Gas Connections
One of the biggest mistakes homeowners make is overlooking plumbing until the last minute. If you’re planning to install a sink, dishwasher or plumbed-in gas barbecue it’s essential to bring in licensed professionals early.
- Water supply – A qualified plumber can connect your outdoor sink to your home’s main water supply so you’ve got hot and cold water available.
- Drainage – Grey water from sinks needs to be directed safely, either to the sewer system or an approved grey water system. Improper drainage can cause blockages or damp patches near your pergola.
- Gas – Many barbecues can be connected directly to your home’s natural gas line. This avoids running out of bottled gas mid-cook and is often more cost effective. According to After Hours Plumbing, choosing the right location for a natural gas grill is essential for both safety and convenience. Gas work should only ever be done by a licensed gas fitter.
Including plumbing in your outdoor kitchen takes the space from being just a cooking area to a fully functioning extension of your home.
Step 4: Choose Durable Materials
Australian weather can be brutal. Blazing sun, heavy rain and salty coastal air can all wreak havoc on your outdoor kitchen. Materials matter.
- Benchtops – Stainless steel, granite or engineered stone are popular choices that resist stains and heat. Avoid porous stones like marble unless they’re well sealed.
- Cabinetry – Choose weatherproof cabinetry, such as marine-grade stainless steel, powder-coated aluminium or sealed hardwoods.
- Flooring – Non-slip tiles, composite decking or sealed concrete work well. Remember safety is key in a space where spills are likely.By choosing hardy weather-resistant finishes you’ll ensure your kitchen stays functional and looking good for years to come.
Step 5: Add Comfort and Ambience
While function is important, comfort is what will make your outdoor kitchen a true extension of your lifestyle. Under a pergola you’ve got plenty of opportunities to add the finishing touches.
- Lighting – Task lighting over cooking zones and ambient lighting for dining areas. LED strip lights under benches or pergola beams can add a modern touch.
- Heating and cooling – Outdoor heaters for winter evenings or ceiling fans for hot summer days.
- Furniture – Weather resistant tables and chairs so guests can linger. Built-in seating with cushions adds style and practicality.
- Décor – Potted plants, outdoor rugs and art pieces make the pergola space feel lived in.
Step 6: Ventilation and Safety
Cooking under a pergola means smoke and heat can linger if the area isn’t properly ventilated. Consider:
- Rangehoods – Outdoor rated rangehoods can extract smoke, grease and odours.
- Louvre roofs or vents – Allow hot air to escape and fresh air to circulate.
- Fire safety measures – Keep a fire extinguisher nearby and flammable materials stored safely away from heat sources.
A pergola with adjustable louvres is particularly useful as you can let smoke escape while still having shelter.
Step 7: Budget and Professional Help
Outdoor kitchens can range from a few thousand to tens of thousands of dollars. Setting a budget upfront will help you decide what’s essential and what’s optional.
Hiring licensed professionals like plumbers, gas fitters, and electricians is key for safety and longevity, as DIY mistakes can be costly and dangerous. A well-designed outdoor kitchen can also boost your home’s value, with a modest ROI of 55–200% achievable, and higher returns possible with premium materials and thoughtful design.
Step 8: Make It Yours
Finally remember an outdoor kitchen under a pergola should reflect how you live. A family that loves weeknight dinners outside might prioritize a simple easy clean barbecue setup. A passionate entertainer might go all out with two fridges, a pizza oven and a wet bar.Personal touches, whether it’s a herb garden in planter boxes, a feature timber ceiling on the pergola or bar stools that match your home’s style will make the space yours.
Style, Comfort and Function Outdoors
An outdoor kitchen under a pergola is more than just a place to cook, it’s a lifestyle upgrade. With planning, durable materials and the right appliances you can create a functional and inviting space that withstands the Australian climate. Don’t forget practical details like plumbing, drainage and ventilation and you’ll go from basic to brilliant.
With the right design and professional help your pergola kitchen will be the heart of your outdoor entertaining, a place where family and friends gather, meals are shared and the best of the Australian outdoor lifestyle is lived year round.