In Australia, outdoor leaks happen more often than you think. The heat cracks fittings. The soil shifts after heavy rain. And your garden taps? It’s the perfect setup for slow leaks that go completely unnoticed.
You might think your sprinklers are just overwatering one patch of lawn. But here’s the truth, it could be an underground pipe leaking for months. By the time you spot it, your water bill has already skyrocketed.
Gold Coast Plumbing and Hot Water stated that “staying ahead of water damage starts with awareness. Learn to recognize the first signs of a leak, understand what different tests show, and keep an eye on your PSI readings.”
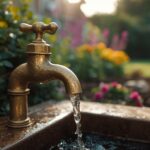
Start at the Hose Bib, Not the Meter
Most people assume leak detection begins at the water meter but that’s not where the process starts.
Attach a water pressure gauge to your outdoor hose bib (garden tap) first. This lets you measure your home’s current city water pressure before doing anything else.
Turn the tap on and check the reading. A normal pressure sits around 60–70 psi. This gives you a baseline to see if your system is holding steady or losing pressure.
Understand the Difference Between Tests
Here’s where a lot of people get tripped up.
Checking for leaks sounds simple, but here’s the catch, you’ve got to know which test you’re performing.
- A hydrostatic test is all about pressure. You pump the system up to see if it can handle more than normal, kind of like testing how strong your pipes are under stress.
- A leak detection test, on the other hand, is much simpler. You’re not forcing pressure, you’re just watching to see if it drops naturally after shutting off the main valve.
So in this case, you’re not adding anything new. You’re just attaching a pressure gauge, turning the water off at the meter, and letting time do the talking.
It’s a quiet test, but one that tells you exactly what you need to know: is there a leak, or not?
Shut Off Water at the Meter
Once you’ve recorded your pressure reading, head to your water meter and shut the main valve off completely.
Take a clear photo of your pressure gauge so you can compare readings later. Make sure to note the time, you’ll wait about 15 minutes before checking again.
This short waiting period helps confirm if pressure is dropping, which means there’s a leak somewhere in your system.
Wait, Watch, and Check for Pressure Loss
After 15 minutes, return to your gauge.
If your pressure has dropped, even by 5 to 10 psi, you’ve got a leak somewhere between the meter and the house. If the pressure stays stable, your line is likely leak-free.
Plumbers recommend extending the wait to 20 minutes if you want extra certainty. It’s a simple, patient step that can save you from digging up your yard unnecessarily.
Isolate the Irrigation System
Before you start testing, make sure your irrigation system isn’t part of the mix.
Turn off the double-check valve so the sprinklers don’t affect the pressure. They’re often where leaks start, and separating them helps you pinpoint if the issue’s inside or outside your home.
Narrow Down the Leak Location
If the gauge shows pressure loss, your next goal is to determine where the leak is.
You can isolate different sections by shutting valves closer to the home or installing a small valve box to separate the yard from the house. This makes it easier to test one area at a time and pinpoint the problem faster.
For example, if pressure drops only when the house valve is open, the leak is likely under or within the home’s plumbing. If it drops when the yard valve is open, the issue’s probably underground.
Confirm the Leak Before Digging
Before you grab a shovel, double-check your results first.
If your pressure gauge drops by about 10 psi or more, you’re likely dealing with an active leak.
Here’s what to do next:
- Listen closely. Running water or a faint hissing sound can point to where the leak is hiding.
- Walk the line. Follow your pipe routes and check for damp or soft patches in the soil.
- Look for surface clues. Puddles or constantly wet areas often show where water is escaping.
Call in the pros if necessary. Plumbers use acoustic listening tools and leak detection sensors to find the exact spot without digging up your yard.
Don’t Forget to Turn the Water Back On
It’s an easy mistake to make after testing; forgetting to turn the water back on.
Before wrapping up, reopen the meter valve and make sure your taps and fixtures are working as normal. Take a final photo of your pressure gauge reading to confirm it’s returned to your original baseline.
Catch Leaks Before They Catch You
Drain Masters Plumbing points out that water leak tests often come up during home sales or inspections.
If you’re a buyer or seller, document everything, be it photos, readings, and timestamps. This helps both parties decide whether to repair the leak immediately or negotiate a price adjustment for the buyer to handle it later.
Outdoor water leaks rarely announce themselves. They start slow and quiet, often below ground. But with a pressure gauge, a little patience, and a systematic approach, you can spot problems early and fix them before they turn into major repairs.
Or, as Gold Coast Plumbing and Hot Water experts might say, “know your system, test it smart, and keep your water where it belongs.”
Good drainage starts with good design. Find outdoor building solutions that work with your home’s layout at Affordable Pergola Melbourne.